The assignment was to create two bedrooms- one fit for a sweet little four year old girl who has a love of flowers, of the perfect color pink, and of books, that are ever growing in her room. And another bedroom for a very cool and charming six year old boy looking for a more rockin' room that ignites his creativity.


The budget was minimal, about $1,000 for both rooms, purchasing items that would make the biggest difference, and having fun with DIY projects to sweeten the space!
The reaction raised the roof! We completed both bedrooms while the family vacationed. Through a lot laughter, creative dizziness, and inspiration drawn from two little kids, the family came home to two fun designer destinations. The kids ran right up to their rooms. All that was heard was a high pitched scream 'Oh my gosh!' 'Oh my gosh!' 'Oh my gosh!' There was a lot of jumping on the bed and rolling around with a giant smile. My favorite part was when the little boy looked at the zig zag wall and asked "How does Shoshana think of this cool stuff? She is so smart!" And kids don't lie :)
Pink It Up
A Little Ladies Bedroom
THE DESIGN


Changes to the design- the color of the bolster pillow and the ceiling fixture is not up yet, but the vision has remained the same.
BEFORE

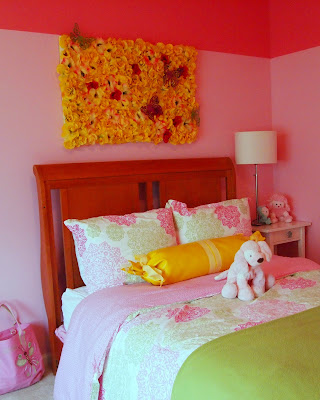
AFTER

The Paint. We used two shades of pink: Sherwin William's 'In the Pink' on the walls and added Sherwin William's 'Coming Up Roses' on the upper walls, eighteen inches from the ceiling. We also used 'Coming Up Roses' eighteen inches on the ceiling starting from the outer walls. This created a faux tray.
The Layout. Changing the layout of the space created a better flow in the room, and the additional new bookcases from IKEA fit right in as a spot to collect books and special mementos, and perch by the window to read.

The Window Treatments. The yellow drapes are from Target online and the pink stagecoach was a DIY project we took on to create a layered colorful effect that makes the room feel cozy.


The Flower Artwork. My favorite part of the room is the artwork over the bed. And it was so inexpensive to make!

The Lemon Bolster Pillow. For big impact we made a three foot vinyl bolster pillow in a lemon shade of yellow. Yes rock star shiny lemon vinyl-a remnant from a local fabric store. How did we do it? With the fabric face down I spread out one 12 oz bag of poly-fil and rolled up the vinyl like rolling up a sleeping bag. I used painters tape to temporarily hold it shut. Then I tied a piece of gingham ribbon around either end. To permanently keep the seam closed on the pillow I used a strong adhesive glue along the seam. When it dried I wrapped more gingham ribbon around the middle, tying it in the back where the seam is.
BEFORE

AFTER


The Art Gallery. We began an art gallery using canvases wrapped in yellow wrapping paper that can display drawings of all kinds. We matted the artwork with green construction paper and included a small description of what the piece was and the date beneath.

'Re-knob' It. To give this dresser a touch of whimsy and make it as unique as the little girl who opens these drawers every day, we changed out the knobs.

SJ found these adorable knobs at www.funknobs.com. This one is called Fiesta Floral by Carol Beach. It made a big impact on all the pieces in the room that had pulls. Just look at the original compared to the new ones!

To see how to create Fake Flower Head Art CLICK here
To see how to create a Stationary Stagecoach CLICK here
To see how to create a Stationary Stagecoach CLICK here
To see how to create Personalized Initial Pillows CLICK here
Comments