 |
| Dream Tree |
You have heard of a 'vision board',
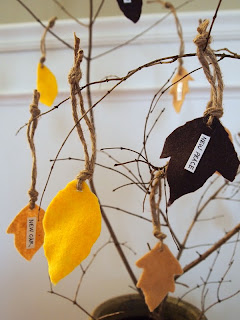
but what about a 'vision tree' called a Dream Tree!
 |
| Sit it by the fireplace, the foyer, or create a smaller version for a table top centerpiece. |
A Dream Tree is meant to add a sweet natural warm feel to a space, while being a constant reminder of all the dreams you hope come true. Every leaf on each branch will contain a dream (a wish) that is hand written by you. It is an easy and inexpensive DIY project you can do in one day! It can be a small centerpiece on a table top, or a large focal point on the ground. Once you create it, you will see it every day and envision your dreams coming true!
This is a kid friendly project too!!
SUPPLIES YOU NEED:
Felt paper
Scissors
Clear tape
Double sided tape
Jute twine
Branches
Leaves
Vase to place the branches in
(You will also need white copy paper, a Sharpie with a fine tip and double sided tape for writing your dreams on the leaves.)
*You can find the branches and leaves outside your home or at a park, and the rest can be found at a craft store. Choose a vase that is deep-can be small and placed on a table top, or larger and placed on the ground.
STEP 1
Decide how big you want your Dream Tree to be then find an appropriate sized vase for it.
Then gather and arrange your branches in it.
*once they are in your vase you can cut them to the size you want.
STEP 2
Time to create your leaves!
Using a pen, trace one of the leaves on your felt paper and cut it out.
STEP 3
Using your scissors, cut a little hole toward the top of the leaf. Then loop a piece of jute twine through the leaf, tie it in a knot, leave three inches then make another knot, and cut the excess off.
STEP 4
Grab a Sharpie with a fine tip, white copy paper, and tape.
Write as many wishes as you want on the white paper using the Sharpie (the height of your words should be shorter than the height of a piece of tape).
Cut around each written wish like the photo above with scissors.
Cut a piece of tape long enough to over each cut piece, place over the piece of written wish, and cut the excess off.
STEP 5
Grab your double sided tape.
Place a piece on the back side of your wish paper.
Then press the back side down on a felt leaf.
STEP 6
Hang your leaves on the branches!
IDEA TIP -
*Use this project as a learning tool for kids by renaming it 'The Thankful Tree' and instead of writing your wishes, have everyone write what they are thankful for!! This is a great idea to do on a rainy day or as a project during Thanksgiving.
Follow the same step by step instructions as above.
"I am thankful for the Earth!"
Happy Fall Everyone!!!
For more ideas on hot Fall home decor trends and inexpensive ideas CLICK HERE.


Comments
Pool Heater