For the last few years you can't get away from hearing the term ‘Man Cave Man Cave
So I went on television today (click here to watch my segment) and lobbied for the female......................
I said "what about us girls?" If a guy can have a special place of his own then surely the ladies deserve their own haven as well. So I am getting out my megaphone and calling all women to what I call 'the LADIES LOUNGE'! So when your roommate, spouse, children, pets, or Aunt Edith stretch you thin, you can hide yourself away to recharge your batteries in a peaceful space of your own. We need to take care of our needs too.
 |
| Doesn't this space look relaxing? This would be the perfect Ladies Lounge for me!! |
Find the Perfect Spot. Create a Ladies Lounge in an extra bedroom, part of the basement, a rarely used office, a large closet, or if you live in a home with a bedroom that has a sitting area, close it off completely with a door or use a room divider. Even a deck in warmer climates can be outfitted with comfy outdoor furniture and storage to hold books, paper, etc. Just make sure the windows are shut from the inside for privacy.
In my own home I redesigned a guest bedroom into a home office for myself that includes a comfy sofa, my fave art books, and a closet I tricked out into a storage center for all my craft supplies.
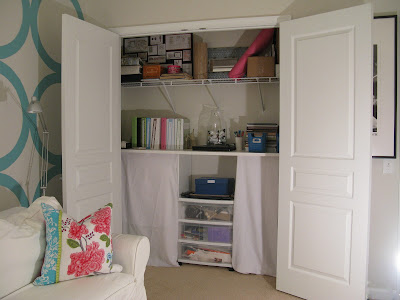
I also have another teeny but havenous area in my home that is my ‘minute meditation spot’; My walk-in closet. I keep my guitar, and some paper and a pen in it. When I need a few minutes to recharge I excuse myself and hang in my closet to play. It relaxes me (until someone finds me). It is a small closet so I hung a large mirror in both the back and front walls so I don’t’ feel like my clothing is going to’ jump me’.

I also have another teeny but havenous area in my home that is my ‘minute meditation spot’; My walk-in closet. I keep my guitar, and some paper and a pen in it. When I need a few minutes to recharge I excuse myself and hang in my closet to play. It relaxes me (until someone finds me). It is a small closet so I hung a large mirror in both the back and front walls so I don’t’ feel like my clothing is going to’ jump me’.
Regardless of the size of your Ladies Lounge, the most important part of having a space to yourself is to create a quiet haven that is filled with comfort, inspiration and relaxation for your mind and body.
Make sure everyone knows this is your special space and they are not allowed to disturb you (a lock on the door helps).
 |
| If you have the room you could find your Zen crafting up a storm in this Ladies Lounge! |
Outfit your Ladies Room with hobbies that relax you. Reading, crafting, sewing, drawing, writing, watching your fave shows on TV, doing yoga, catching up on the web, or getting jiggy to your favorite tunes; Anything that makes you happy! Just don’t forget the Do Not Disturb Sign and box of chocolates.

Add your personality:
- Cheerful paint color or wallpaper
- Colorful bold Accents (try using Pantone color pick of 2011 Honeysuckle 18-2120; it is very pink)
- A comfy chaise or daybed, chair with ottoman
- Funky or glam lighting
- Snuggly throw
- Scented Candles
- Tons of books and magazines you enjoy
- Crafts you like organized in boxes on shelves
- Table to spread your ‘stuff’ out on
- BIG mirror so even the smallest room feels larger
- Secret stash of sweet or salty snack
- Bottles of water
- Display your cherished collectibles (I collect and hang necklaces on vintage hooks)
You don’t need to spend a lot of money on your Ladies Lounge. Part of the fun of having a Ladies Lounge is creating it so take your time and use your imagination. Re-purpose, re-paint an old piece of furniture, add new knobs.
Here are a few fun do-it-yourself projects for a fun Ladies Lounge:
Create a custom cork board using an old frame.
"I was inspired to make this project after I broke the glass from a large black frame."
You will need:
frame (no glass)
natural cork roll
foam board (can get from Dollar Store or craft store)
Scissors or cutting knife
Hot glue gun
Glazier Points (can get from any framing store)

 |
| Get this look using the DIY projects below-so fun!!! |
"I was inspired to make this project after I broke the glass from a large black frame."
You will need:
frame (no glass)
natural cork roll
foam board (can get from Dollar Store or craft store)
Scissors or cutting knife
Hot glue gun
Glazier Points (can get from any framing store)
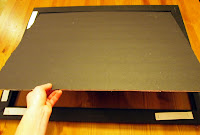
STEP 1
 |
| Get out your frame, foam board and rolled cork. |
STEP 2


Cut foam board to fit in frame opening. I suggest scoring it with a scissor or cutting knife, then bending it back to cut.
STEP 3


Cut the cork roll the same size as foam board and hot glue it to one side of the foam board.
STEP 4
With the frame facing down place the cork board side face down into the frame. It should fit snug.
STEP 5
With frame face down push the pointed edge of the glazier point into the side wall of the frame (you may need to use a flat head screw driver if the wood is too hard).
Ta Da!!!

Turn ordinary push pins into cute adornments.
You will need:
push pin
felt shapes or anything else you would like (you can get at a craft store)
hot glue gun
STEP 1
 |
| Place some hot glue on the head of the push pin and glue backside of the felt piece to it Ta Da!!! |

You can also do this same technique with larger weightless cute pieces like this flower from a craft store:


Paper Balls.
'I was inspired by those expensive shell balls you find at decor stores."

You will need:
Styrofoam balls (I used 2-1 / 2" 6 / Pkg-White balls from a craft store)
scrapbook paper (you will need one square sheet per ball)
STEP 1
 |
| Rip up a sheet of scrapbook paper into small pieces. |
STEP 2
 |
| Crumple it up with your fingers. |
STEP 3
 |
| Hot glue each crumpled piece around the entire ball. |
STEP 4
 |
| "You're halfway there!" |
Ta Da!!!
 |
| Use different color scrap paper with various patterns to create different looks then group them together in a bowl. |
I really love the way these balls came out!!

Cover old books with pretty paper to add style to your Ladies Lounge.
You will need:
You will need:
Large paper that will fit the books you want to cover (I suggest using wrapping paper or wallpaper roll)
Scissors
Labels (if you want to add the title info on the book)
STEP 1
 |
| Place the paper horizontally on a flat work surface Set your book on top of the paper. Center the book and use a pencil to mark the paper along the top and bottom edges of the book. Remove the book from the paper and fold the top and bottom edges toward the center of the paper from the marked lines. Your book cover will now be the same height as your book |
STEP 2
 |
| Set the book, open, back on the paper, aligning it with the folds. Center the book and fold the left and right edges of the paper over the front and back covers of the book. |
STEP 3


STEP 4
 |
| Add a label to identify book info. |
Ta Da!!!

Create clip canvas instant art that can be changed out as many times as your inspiration changes.
What you will need:
2 1/2" Bulldog Clip (you can get this at any craft or office supply store)
9"x12" Artist Canvas Panel (you can get at any craft or art supply store)
Nails (to hang on wall)
Hammer
STEP 1
 |
| This is the easiest project EVER!! Simply use the clip to attach your fave artwork to the canvas panel and hang on wall using a nail. Change the artwork any time! |

These projects are very easy because, well, I don't like hard DIY projects :) If you try any I would love to hear about it!
p.s. I designed the Ladies Lounges above using Olioboard.
Comments