
Guest rooms get the short end of the stick. They are not given the same attention as the other rooms in the home. You can usually find furniture hand-me downs and mismatched bedding in these, all too often, small spaces. But your guests are special and the room you offer them for their stay should be welcoming and comfortable. I recently re-designed a guest room for a client in Allentown, PA. The room was small in size but in the end, big on drama.
For this guest room, I knew immediately the focal point would be the bed. I wanted my clients’ guests to walk in and want to sink into a sea of warmth. I chose a milky neutral paint on the walls and turned to rusty oranges and chocolates for bedding, window treatments, and accent colors. The crème de la crème would be the headboard. It had to have major curb appeal and be comfy. Custom headboards for a full size bed can be expensive and although I think guest rooms should not be left in the 1980-1990 era complete with all the furnishings you had back then, you do not need to spend a lot of money on it either.
To save money on this project I decided to take on the challenge of building one myself. It was actually easy. I found clearance priced cushions that had the look I wanted, and then I simply went to Home Depot where I purchased all my wood and screws. They even cut the wood for me! All I had to do was go home and put it together. I recommend this project to anyone willing to do a little measuring and drilling. If you have any cushions at home, recycle them into a headboard. If you have any fabric (i.e. old window panels) or wallpaper at home, recycle it also! It takes some thinking outside the box, but you will be so proud of yourself for doing it!!
Below I have listed everything I used to build this headboard and a step by step guide.
For this project I needed:
1/2” thick piece of plywood cut to width of full size bed.
3 pieces of 2x4 wood cut a bit smaller than my plywood
1 ¼” drywall screws
3” drywall screws
2 27” square cushions
54”x37” piece of wallpaper
fabric trim
Power drill
Hot glue gun
fishing wire and sewing needle3” drywall screws
2 27” square cushions
54”x37” piece of wallpaper
fabric trim
Power drill
Hot glue gun
buttons found around the house
My costs included:
$30 for both cushions
FREE wallpaper remnant
$11 for ½” plywood
$2.60 for 2 2x4s
$8 for all screws
$12 for fabric trim
= $63.60
Caution should be used when operating a power drill, screws, and hot glue gun. Never leave these items unattended with children around.
STEP BY STEP GUIDE:
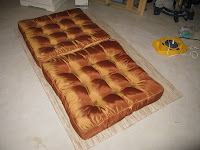
 1. This is what my headboard is made out of: cut plywood the width of the bed, 2 yummy cushions, & textured wallpaper.
 2. I wrapped the textured wallpaper around my plywood board and hot glued the edges down pulling tightly on the backside.
 3. This is what it looks like so far.
 4. Using 3 screws, I drilled two pieces of 2x4 wood, one 5 inches from the top and one 5 inche from the bottom of my plywood that will be used to hang the finished headboard on the wall later. I made sure the 2x4s were level. When I finish the headboard I will screw an identical piece of 2x4 wood into my wall, again, keeping it level (make sure you locate your studs), then simply hang my headboard right on top of the 2x4 in the wall. This hanging method is called a cleat.


 6. I placed the headboard on a sawhorse topside up with the cushions on it. I threaded a sewing needle with thin fishing wire and on the backside of my headboard, pushed the needle through the holes I drilled, and then through the cushion button hole and back again making a stitch, then pulling the fishing wire tight, I tied it tight around a button. I did this for each of the drilled holes.
 7. Once the cushions were attached I hot glued fabric trim all around the edges of my headboard.

 1. This is what my headboard is made out of: cut plywood the width of the bed, 2 yummy cushions, & textured wallpaper.
 2. I wrapped the textured wallpaper around my plywood board and hot glued the edges down pulling tightly on the backside.
 3. This is what it looks like so far.
  4. Using 3 screws, I drilled two pieces of 2x4 wood, one 5 inches from the top and one 5 inche from the bottom of my plywood that will be used to hang the finished headboard on the wall later. I made sure the 2x4s were level. When I finish the headboard I will screw an identical piece of 2x4 wood into my wall, again, keeping it level (make sure you locate your studs), then simply hang my headboard right on top of the 2x4 in the wall. This hanging method is called a cleat.


5. I measured where all the button holes were on the cushions and made an identical grid on headboard itself using a pencil. I drilled small holes into the headboard where the buttons were located.
 6. I placed the headboard on a sawhorse topside up with the cushions on it. I threaded a sewing needle with thin fishing wire and on the backside of my headboard, pushed the needle through the holes I drilled, and then through the cushion button hole and back again making a stitch, then pulling the fishing wire tight, I tied it tight around a button. I did this for each of the drilled holes.
  7. Once the cushions were attached I hot glued fabric trim all around the edges of my headboard.
Ta Da! Took two hours to complete this headboard.

Comments
Well done you.
This had clear instructions with great pictures of the fiddly bits.
Thank you for sharing your lovely headboard.
Im off down the DIY shop!